Set up a partial (CNAME) zone
A partial (CNAME) setup allows you to use Cloudflare’s reverse proxy while maintaining your primary and authoritative DNS provider.
Use this option to proxy only individual subdomains through Cloudflare’s global edge network when you cannot change your authoritative DNS provider.
Step 1 — Add your domain to Cloudflare
Create a Cloudflare account and add your domain.
For your Plan, choose Business or Enterprise.
Add your domain to Cloudflare. You should land on the Overview page.
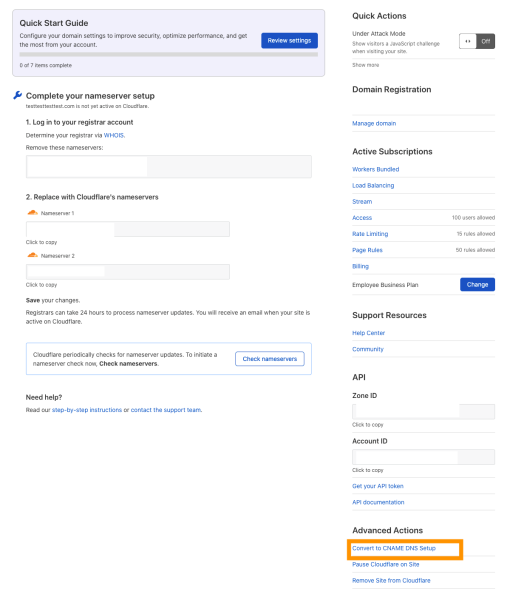
Ignore the instructions to change your nameservers.
For Advanced Actions, click Convert to CNAME DNS Setup.

Click Convert.
Save the information from the Verification TXT Record. If you lose the information, you can also access it by going to DNS > Records > Verification TXT Record.
Step 2 — Verify ownership for your domain
Once you add your domain to Cloudflare, add the Verification TXT Record at your authoritative DNS provider. Cloudflare will verify the TXT record and send a confirmation email. This can take up to a few hours. A verification record for Example verification record
example.com might be:Type Name Content TXT cloudflare-verify.example.com966215192-518620144
That record must remain in place for as long as your domain is active on the partial setup on Cloudflare.
Optional — Provision an SSL certificate
To provision a Universal SSL certificate through Cloudflare, follow these instructions.
If your domain is already live with a partial DNS setup — with Cloudflare or another DNS provider — you cannot use a TXT record for Domain Control Validation. That domain’s TXT record needs to be reserved for forwarding traffic to Cloudflare.
Step 3 — Add DNS records
In Cloudflare, add an
A,AAAA, orCNAMErecord.At your authoritative DNS provider:
Remove any existing
A,AAAA, orCNAMErecords on the hostname you want to proxy to Cloudflare.Add a
CNAMErecord for{your-hostname}.cdn.cloudflare.net.Example CNAME record at authoritative DNS provider
The
CNAMErecord forwww.example.comwould be:www.example.com CNAME www.example.com.cdn.cloudflare.netRepeat this process for each subdomain proxied to Cloudflare.